Custom Application Launcher
Securden facilitates launching connections with remote IT assets and applications. In addition to the default modes of launching web-based connections and through native clients, you can define custom application launchers to supply/autofill credentials and automatically launch any application, including thick application clients.
Creating a custom launcher basically involves creating a profile for each such application capturing the input fields as found in the target application. The profile will have placeholders to replace the required values from Securden repository at the time of launching the connections.
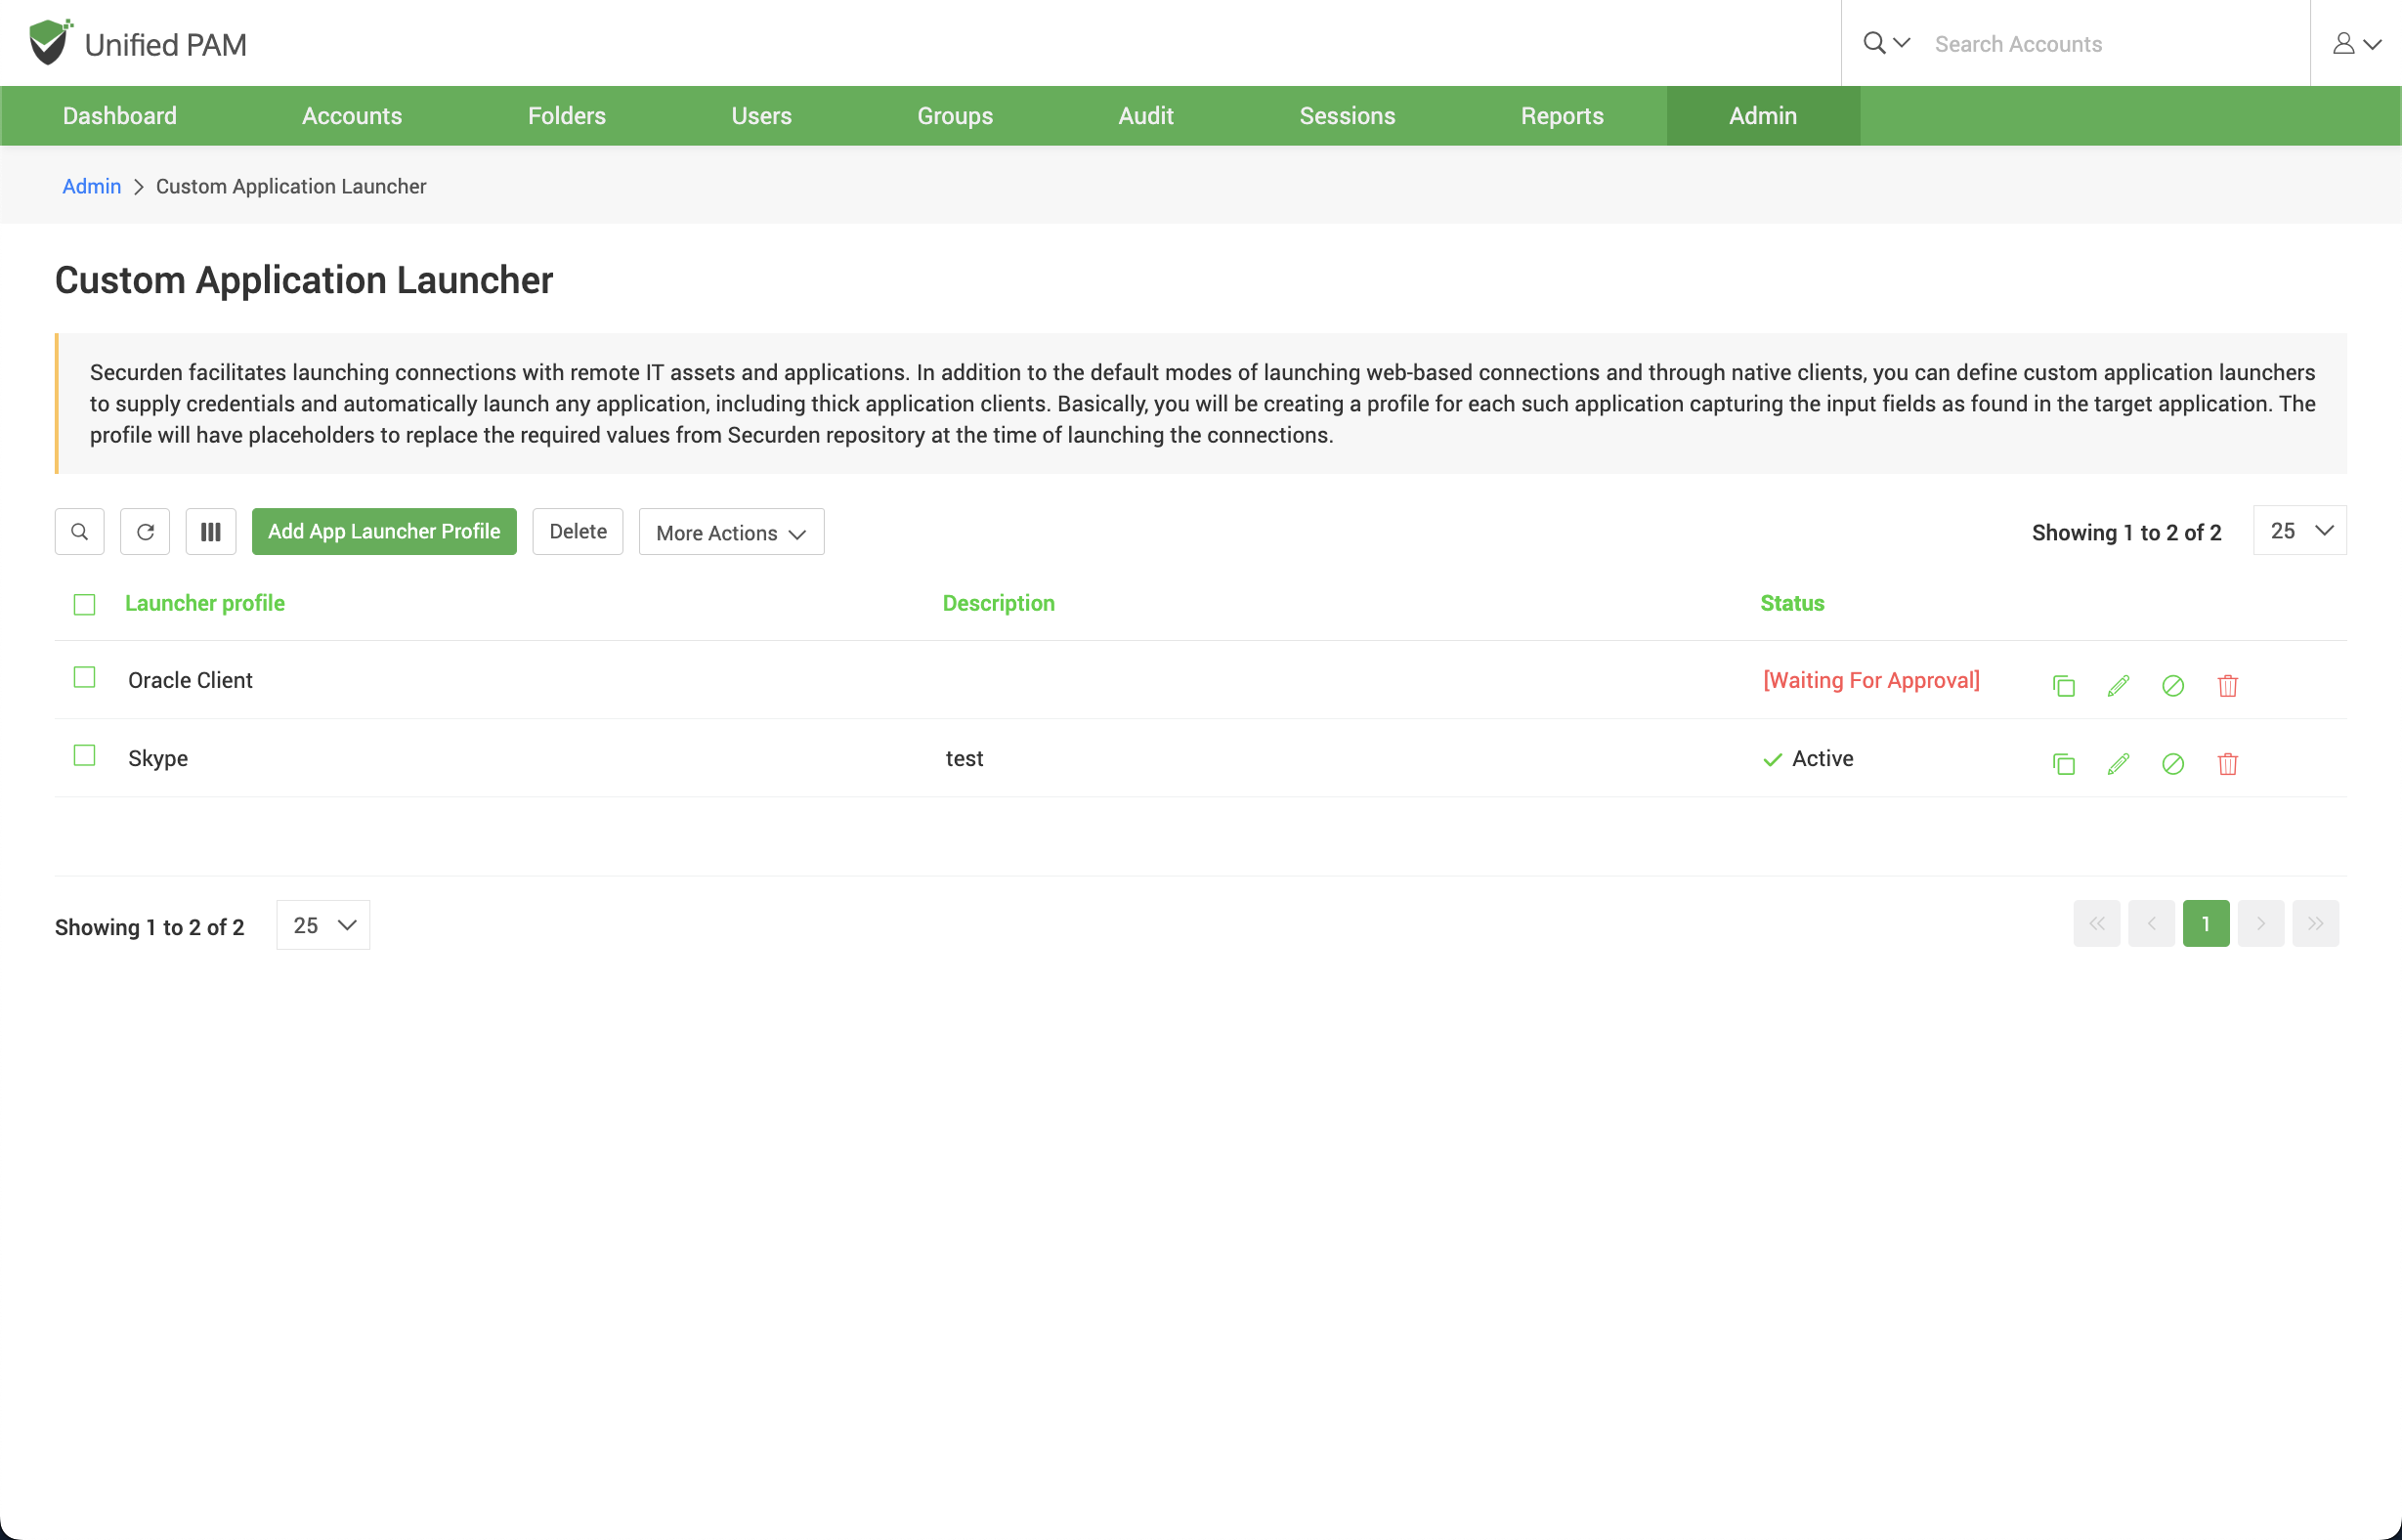
To create/configure the application launcher profile, navigate to Admin >> Remote Sessions and Recordings >> Custom Application Launcher.
In the page that opens, you can create new app launcher profiles or configure existing launcher profiles.
Create an app launcher profile
To create a new application launcher profile, click on Add App Launcher Profile.
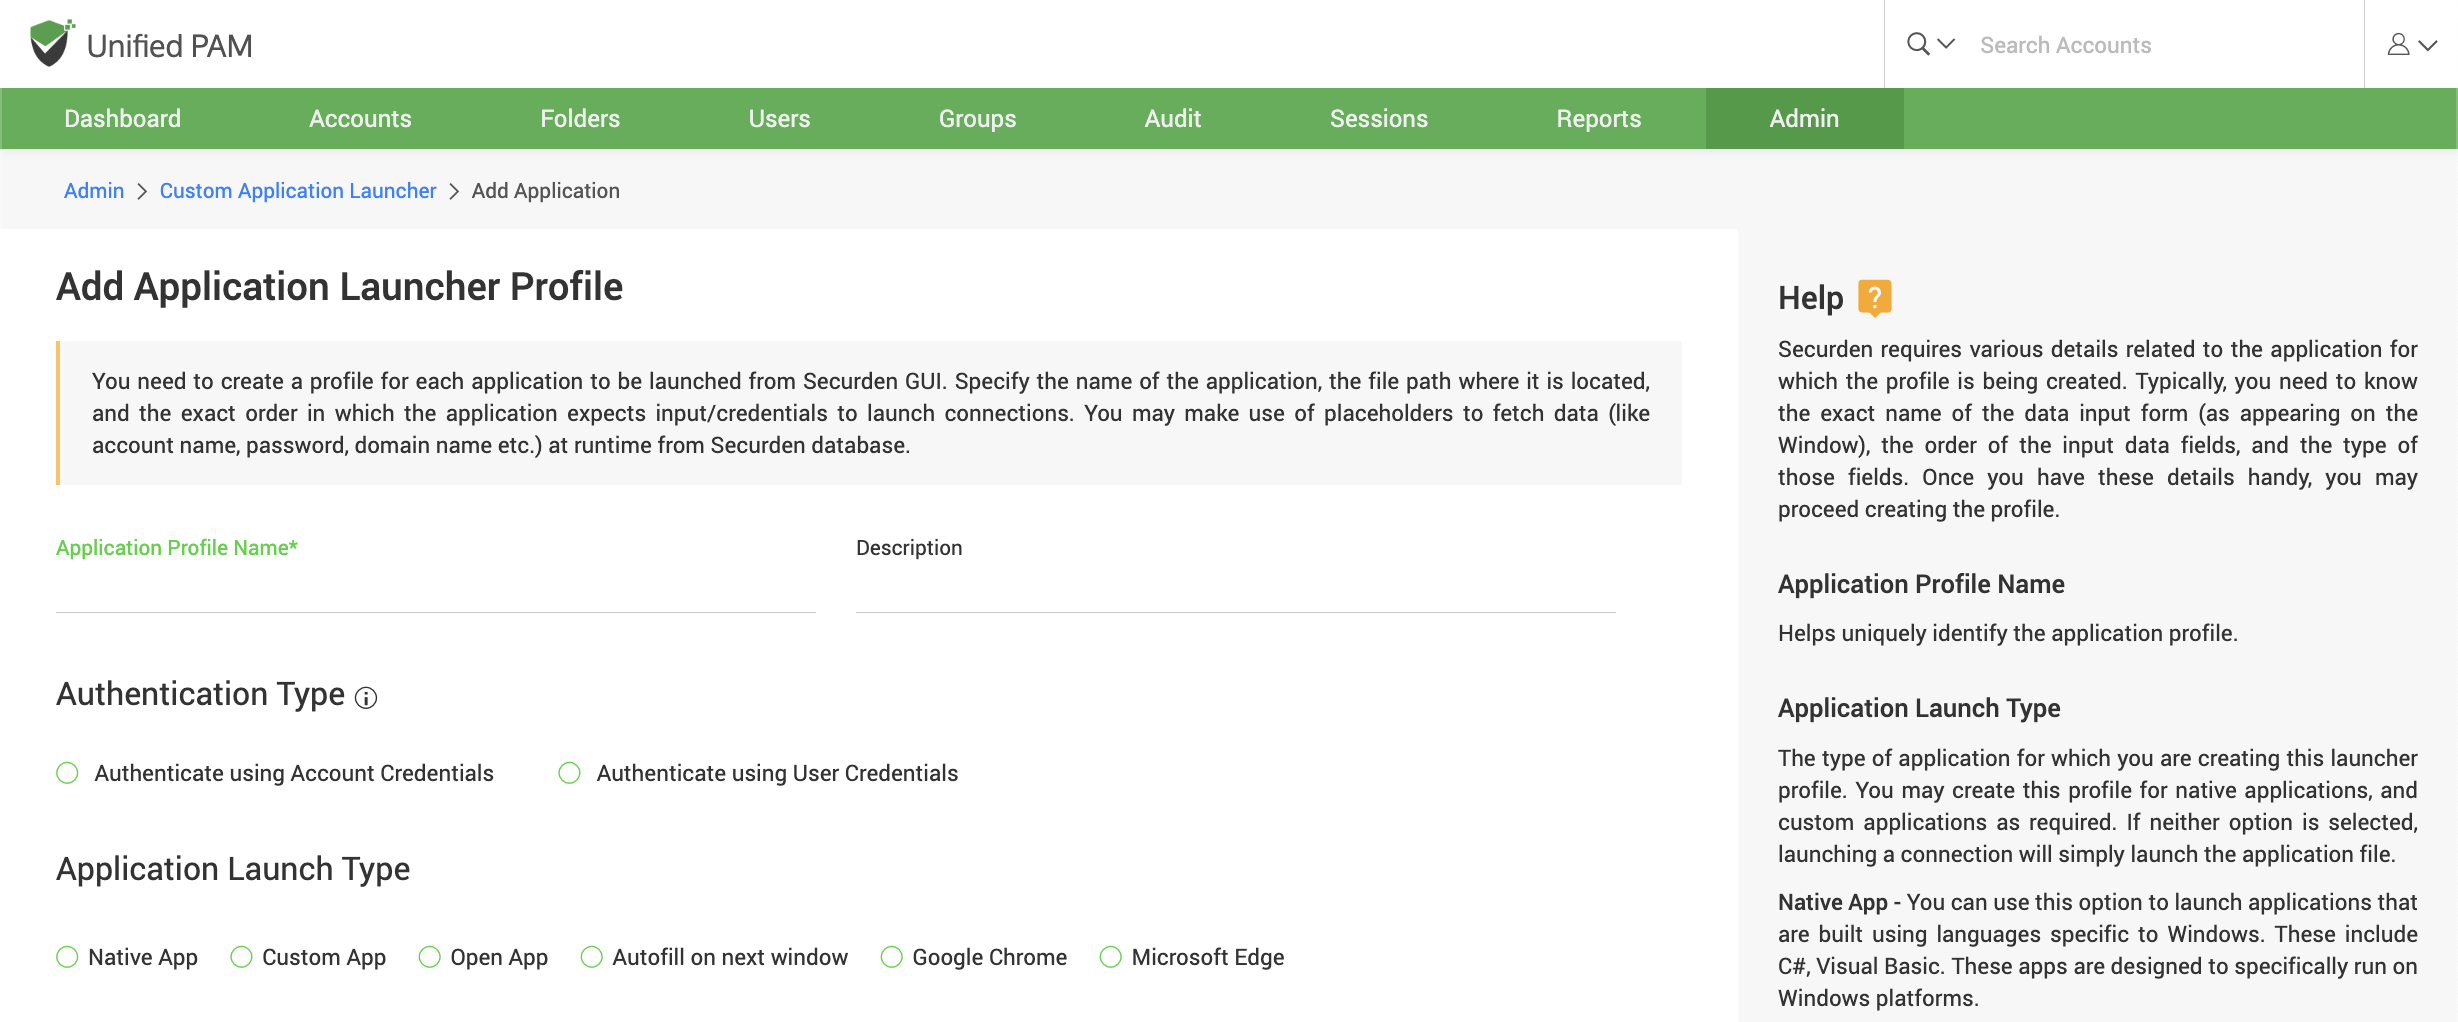
Securden requires various details related to the application for which the profile is being created.
Typically, you need to know the exact name of the data input form (as appearing on the Window), the order of the input data fields, and the type of those fields. Once you have these details in hand, you may proceed to create the profile.
In the GUI that opens, the following fields need to be filled:
Application Profile Name: The name that you enter here helps you uniquely identify the application profile being created. This name will appear on the remote connection launching section in Securden. Your users will identify the launch option through this name.
Description (Optional): A brief of the app launcher for a quick overview, this could explain the purpose of this launcher profile.
Authentication Type
- Authenticate using Account Credentials If you select this option, you need to specify the account types for which this custom application launcher profile is applicable. Once the profile is created, it will be automatically added to the list of available connections for all accounts of the selected type and the account credentials will be used for authentication
- Authenticate using User Credentials
Once the application launcher profile is created, it should be associated with
the required users. Credentials of the associated user will be used for
authentication. To associate the profile, navigate to Admin >> Remote Sessions and Recordings >> User - Assets/Applications Association
Once you have filled these fields, you need to select an Application Launch Type
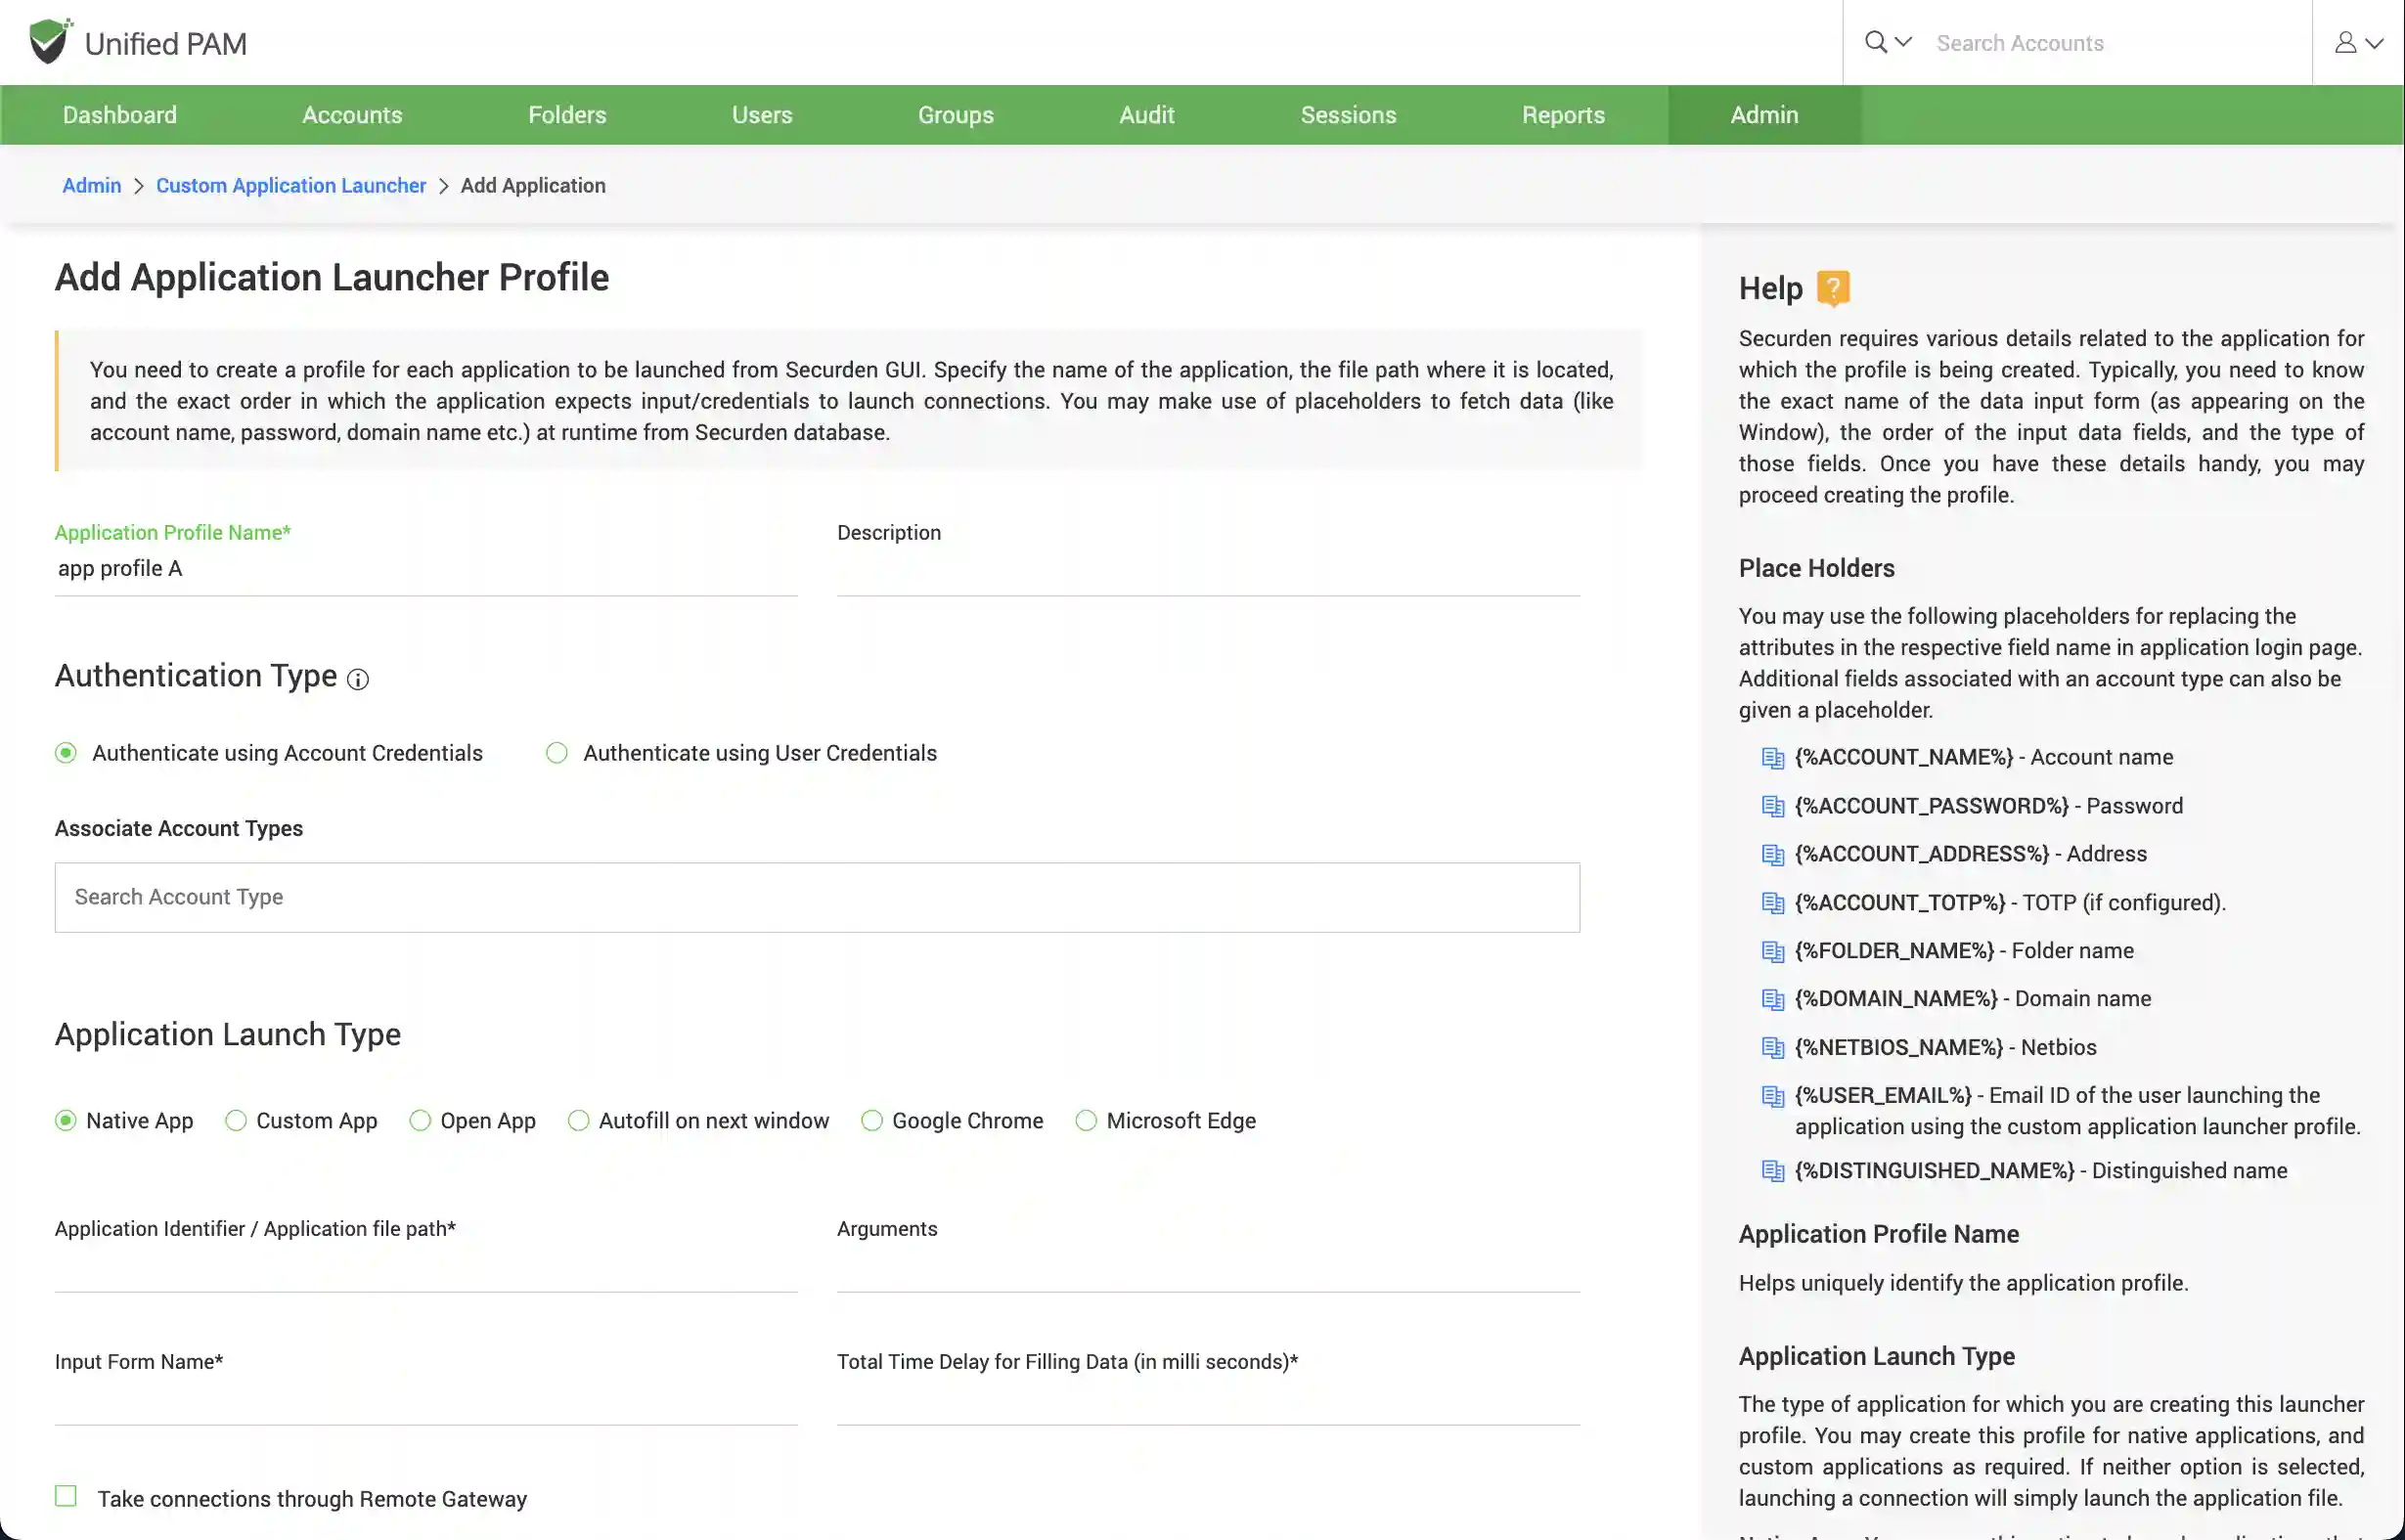
This is the type of application for which you are creating this launcher profile. You may create this profile for native applications, custom applications or explore other options as required. - Native Applications: Generally, Windows applications possessing one or more drop-downs, text-boxes, password fields and action buttons are called native applications in Securden. Securden can easily identify the fields of native windows apps. If you are familiar with the exact values the fields in your application would hold, you may select the option Native Apps. SQL server studio is a typical example of a native app.
- Custom Applications: Applications that have a more complex field pattern can be classified as custom applications. Zoom, Skype, any other app/web-app are examples of custom applications.
- Open Application: If you wish to simply launch/open an application without needing to input credentials and other fields in it, you may select the option Open App.
-
Autofill on next window: If you want to autofill credentials on active applications, you can select the checkbox Autofill in the next active application. Although, while launching a connection using this method, applications will not be launched. Instead, Securden will autofill credentials in the next active application window (the window that opens when you press Alt+Tab). You need to ensure that the appropriate window is manually launched beforehand and is the next active window.
Important
The autofill option simply changes the input focus to the next active application regardless of its type and autofill the credentials. For example, if the next active application happens to be a notepad, it will autofill the credentials there too. So, exercise care in selecting this option. If you are granting access with ‘Open Connection’ permission to an account, enabling this option may result in auto-filling credentials (in plain text) on any application and might potentially reveal the credentials.
-
Google Chrome/Microsoft Edge: If you wish to launch a chrome or edge browser you can select this option. Securden auto-fills the fields known for the Chrome/Edge profile so you can fill the rest with ease.
Application Identifier/Application file path: This is an important configuration parameter. You need to specify the name of the custom application you want to launch (for example, test.exe. The application should be in the system path) OR the exact file path of the application (for example, C:\example\testapp.exe). This application should be available on all the client machines from which users would try to launch the application from Securden.
Arguments (Optional): If the application requires any arguments to be passed for launch, you may enter the same here. For example, some applications might require IP addresses to launch the application. In such cases, you may pass the required value as an argument as shown below:
/h {%ACCOUNT_ADDRESS%}
Input form name: Exact name of the data input form of the application (as appearing on the Window)
Time Delay for Filling Data: While launching connections, the application might take time to launch. To handle such scenarios, you can configure time delay in milliseconds for Securden to start filling the data.
Account Type: This represents the Account Type in Securden. The custom profile being created, will be applicable only for the selected account type.
Creating a native app launcher profile
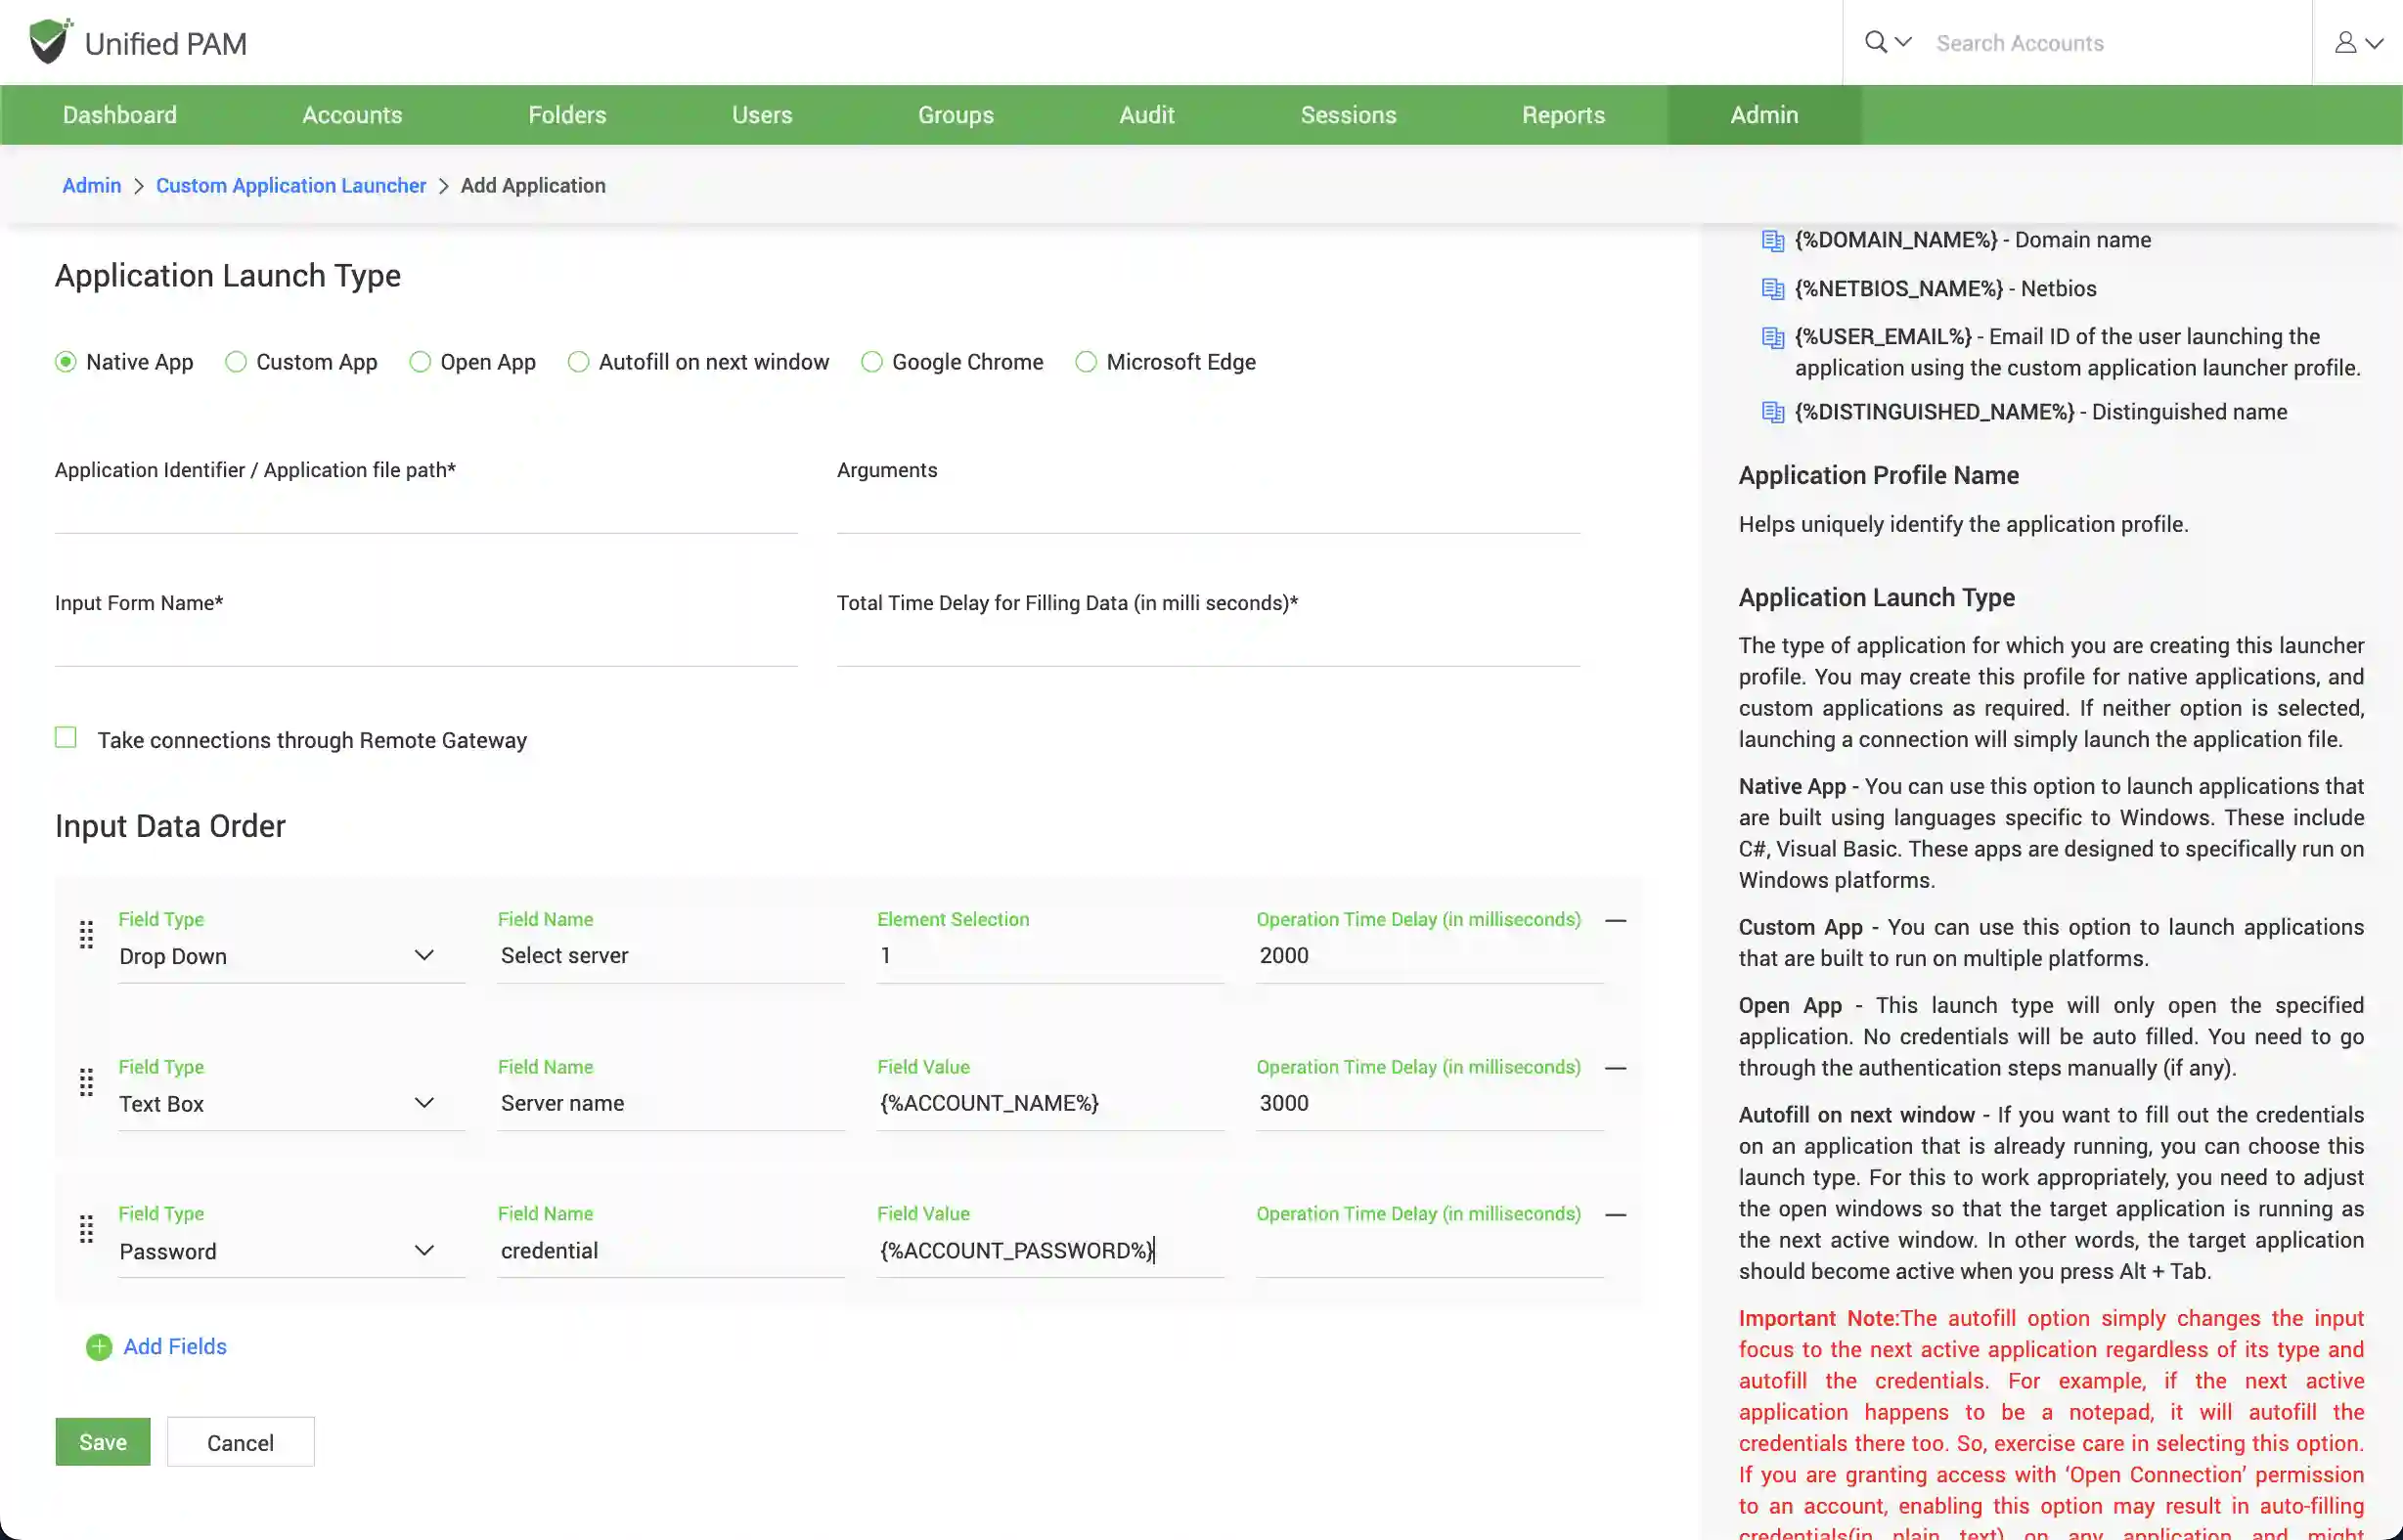
Native app launcher profiles will require you to fill in the order of input data fields and enter the field value. Each input action has to be defined according to the order in which they will be filled.
The steps to follow while entering each input action is as follows:
-
Firstly, select the field type – this can either be a text field, a button, a password or a drop-down.
-
Then, enter the name of the field that appears on the application.
-
Specify Field Value and Select Element
If the field type in your application form is of the type Drop Down you will have to take care of Element Selection.
Element Selection for drop-down allows you to select the entries from the drop-down. If you enter the element value as ‘0’, the first entry in the drop down will be selected. 1 will choose the second entry and so on.
If the field type in your application form is of the type Text-box you will have to take care of Specify Value.
In the case of text fields, you can specify the value to be filled in for the specific input field. It could be the account name, password, or any other value. When specifying the value, you have the option to use placeholders as explained below.
The values for the placeholders will be taken by Securden at runtime:
You may use placeholders for replacing the attributes in the respective field name in application login page.
{%ACCOUNT_NAME%} - to be replaced with the respective “Account name” at runtime
{%ACCOUNT_PASSWORD%} - to be replaced with the account’s password at runtime
{%ACCOUNT_ADDRESS%} - to be replaced with the respective account’s “IP Address” at runtime
{%ACCOUNT_TOTP%} - to be replaced with the respective account TOTP token at runtime (if configured)
{%DOMAIN_NAME%} - to be replaced with the domain name of the mentioned account
{%NETBIOS_NAME%} - to be replaced with the NetBIOS name of the account mentioned.
- Specify Time delay
Wherever you want Securden to wait for a few milliseconds before filling the respective data while launching the application, you may add Time Delay in milliseconds.
Once you have defined the Input Data Order, click Save to add the native app launcher profile in Securden. The native application can now be directly launched from Securden.
Creating a custom app launcher profile
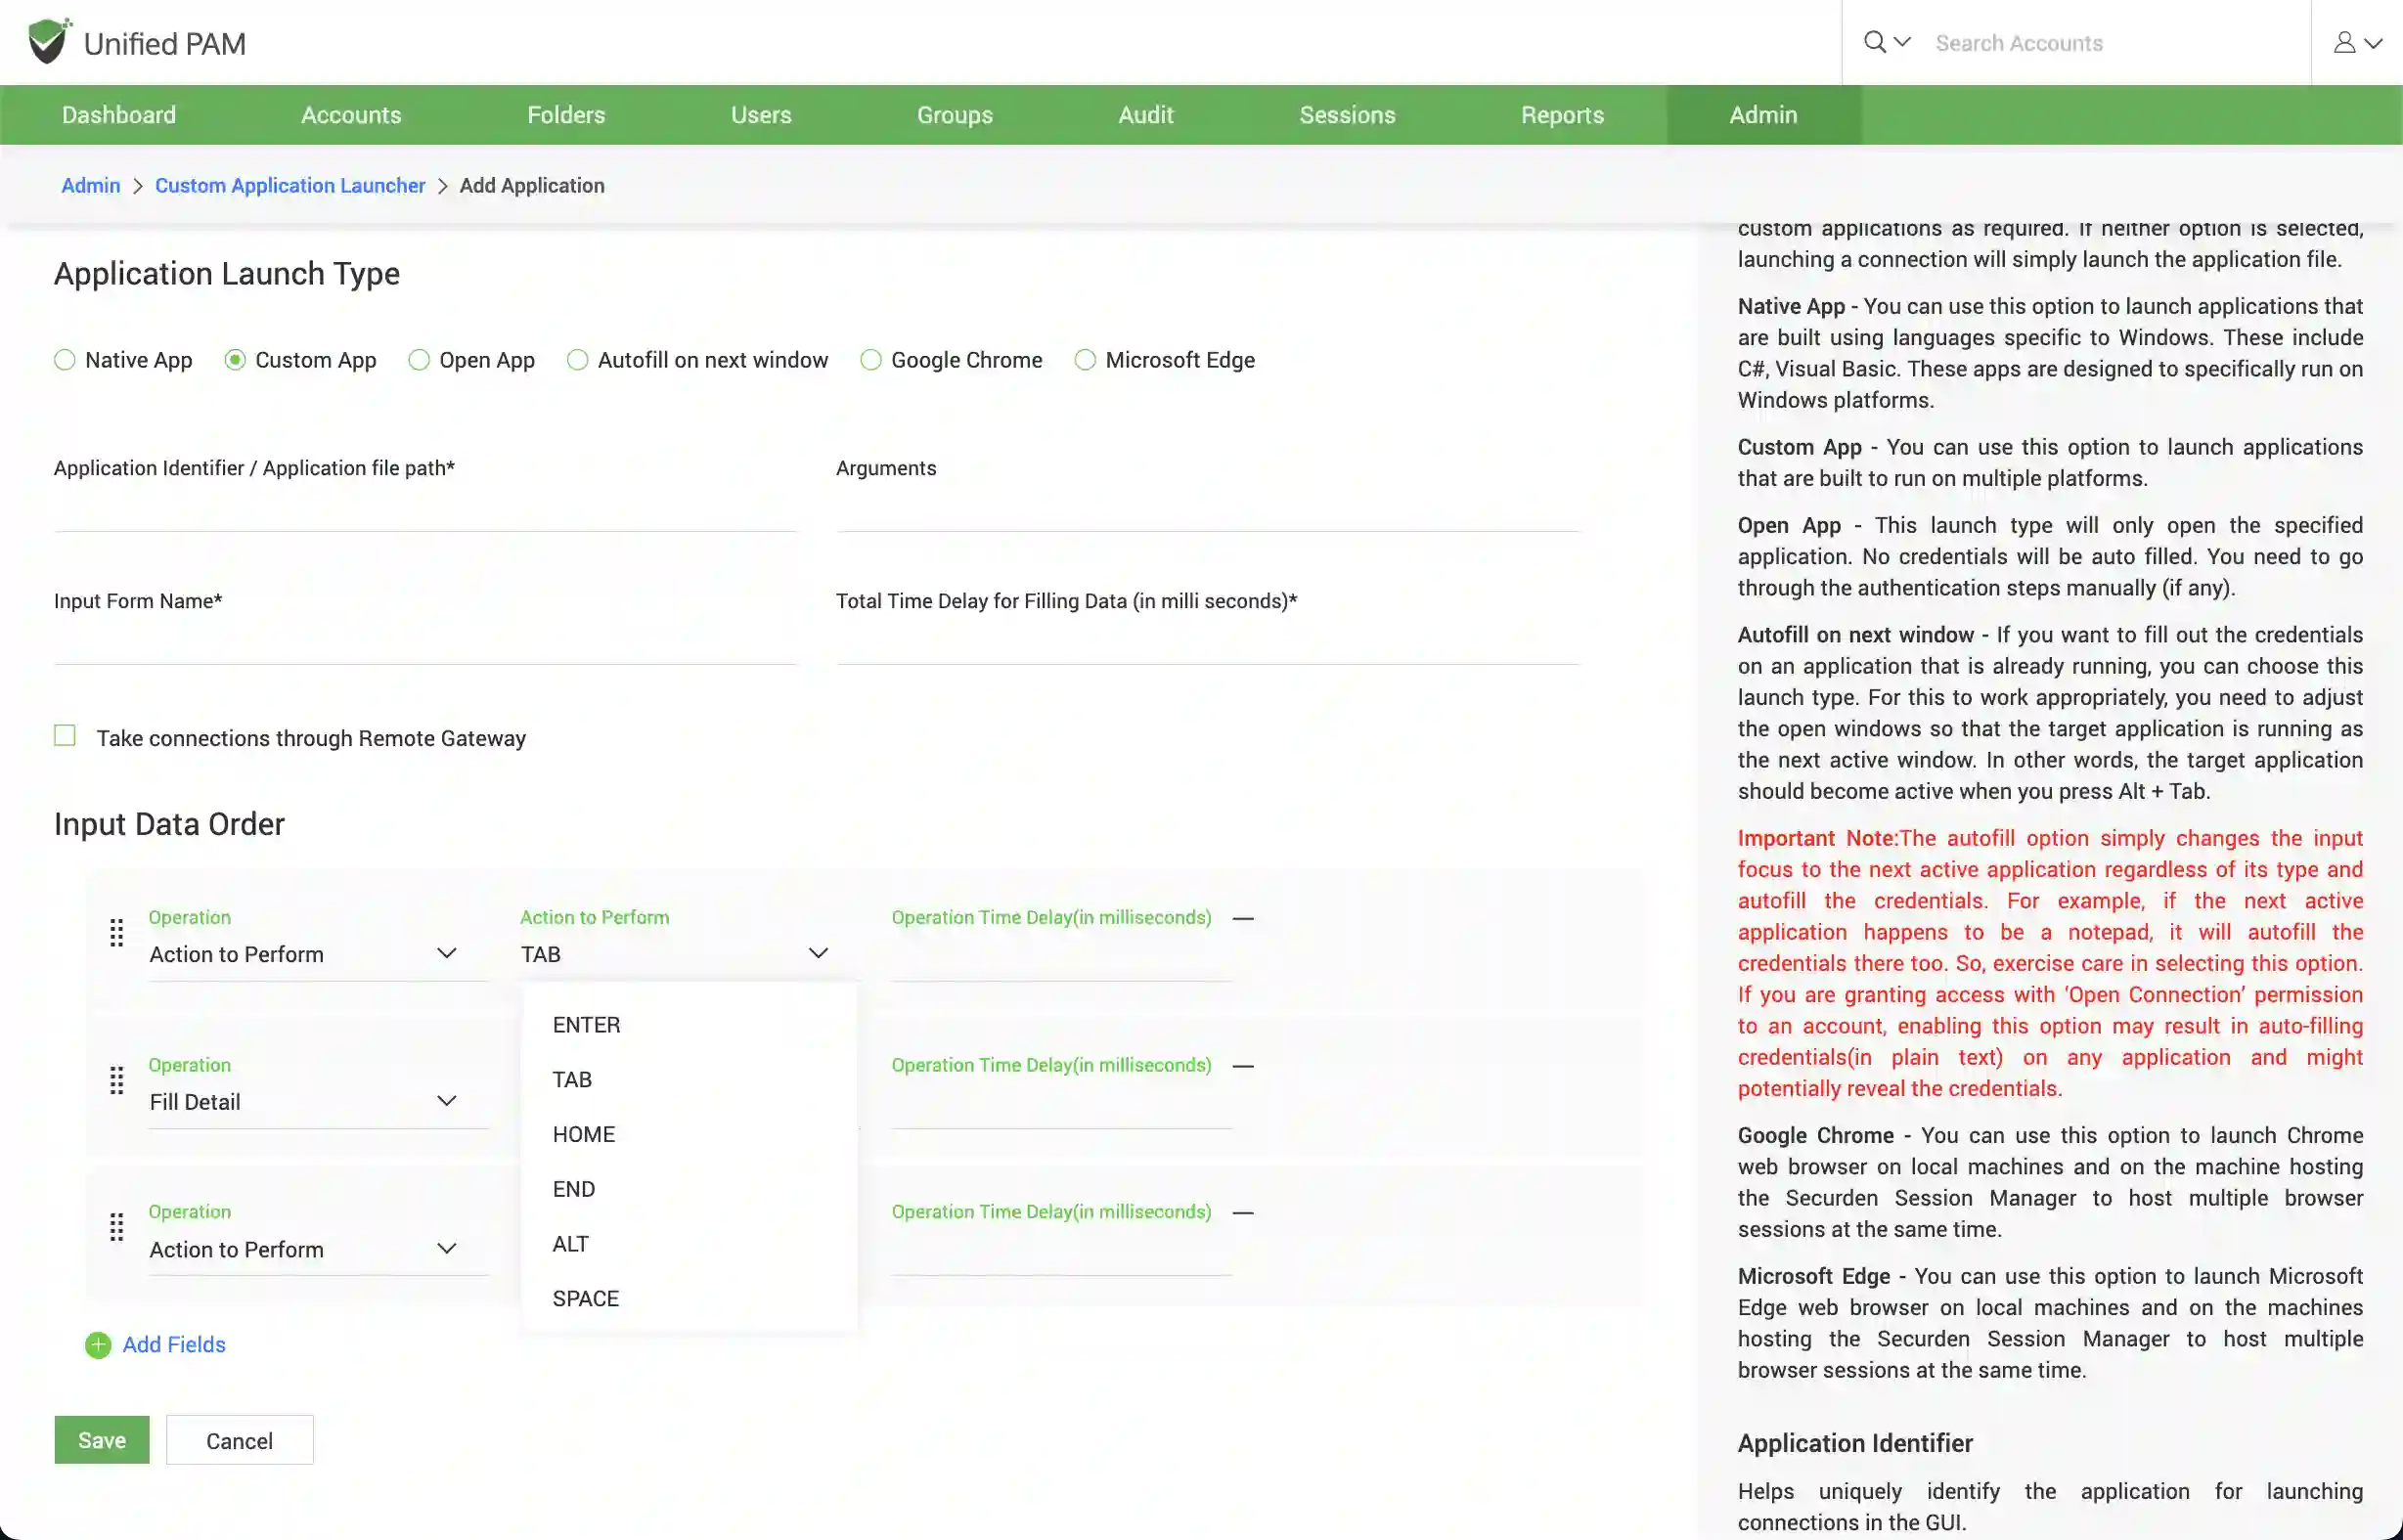
Custom app launcher profiles require you to fill in the order of input data fields and enter the field value, similar to the native app launcher. Each input action has to be placed according to the order in which they will be filled in the application.
The steps to follow while entering the input data order is as follows:
-
Firstly, select the Action to Perform - This lets you perform actions like clicking TAB, ENTER, SPACE etc. on the application.
-
Then select the Fill Detail operation and specify the value that will be filled in after the selected action is performed.
-
Repeat the input actions in the order that they will be carried out.
You have to carry out these steps for each input action added to the launcher. Once you have defined the Input Data Order, click Save to add the custom app launcher profile in Securden. The custom application can now be directly launched from Securden.
Launching Remote Connections Using the Custom Launcher
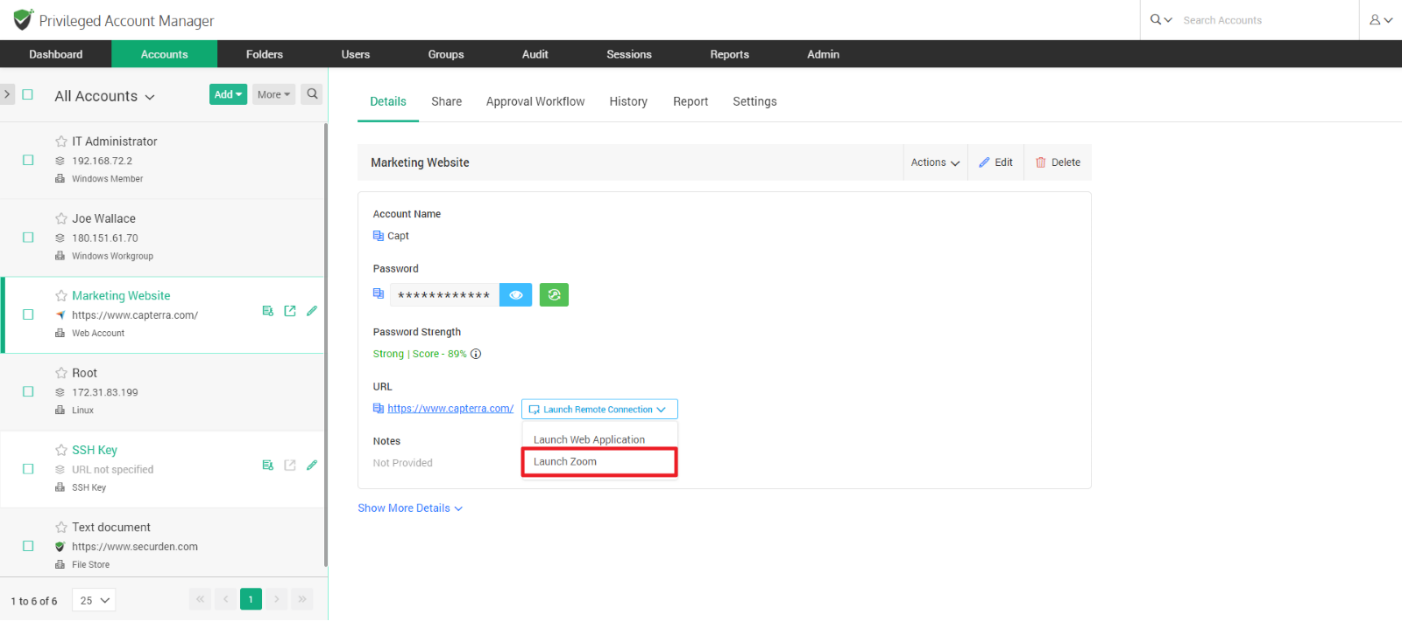
Once you create the app launcher profile, the custom app launcher will be available in the remote access drop-down for accounts with the specified account type.
You can click that and directly launch the connection.
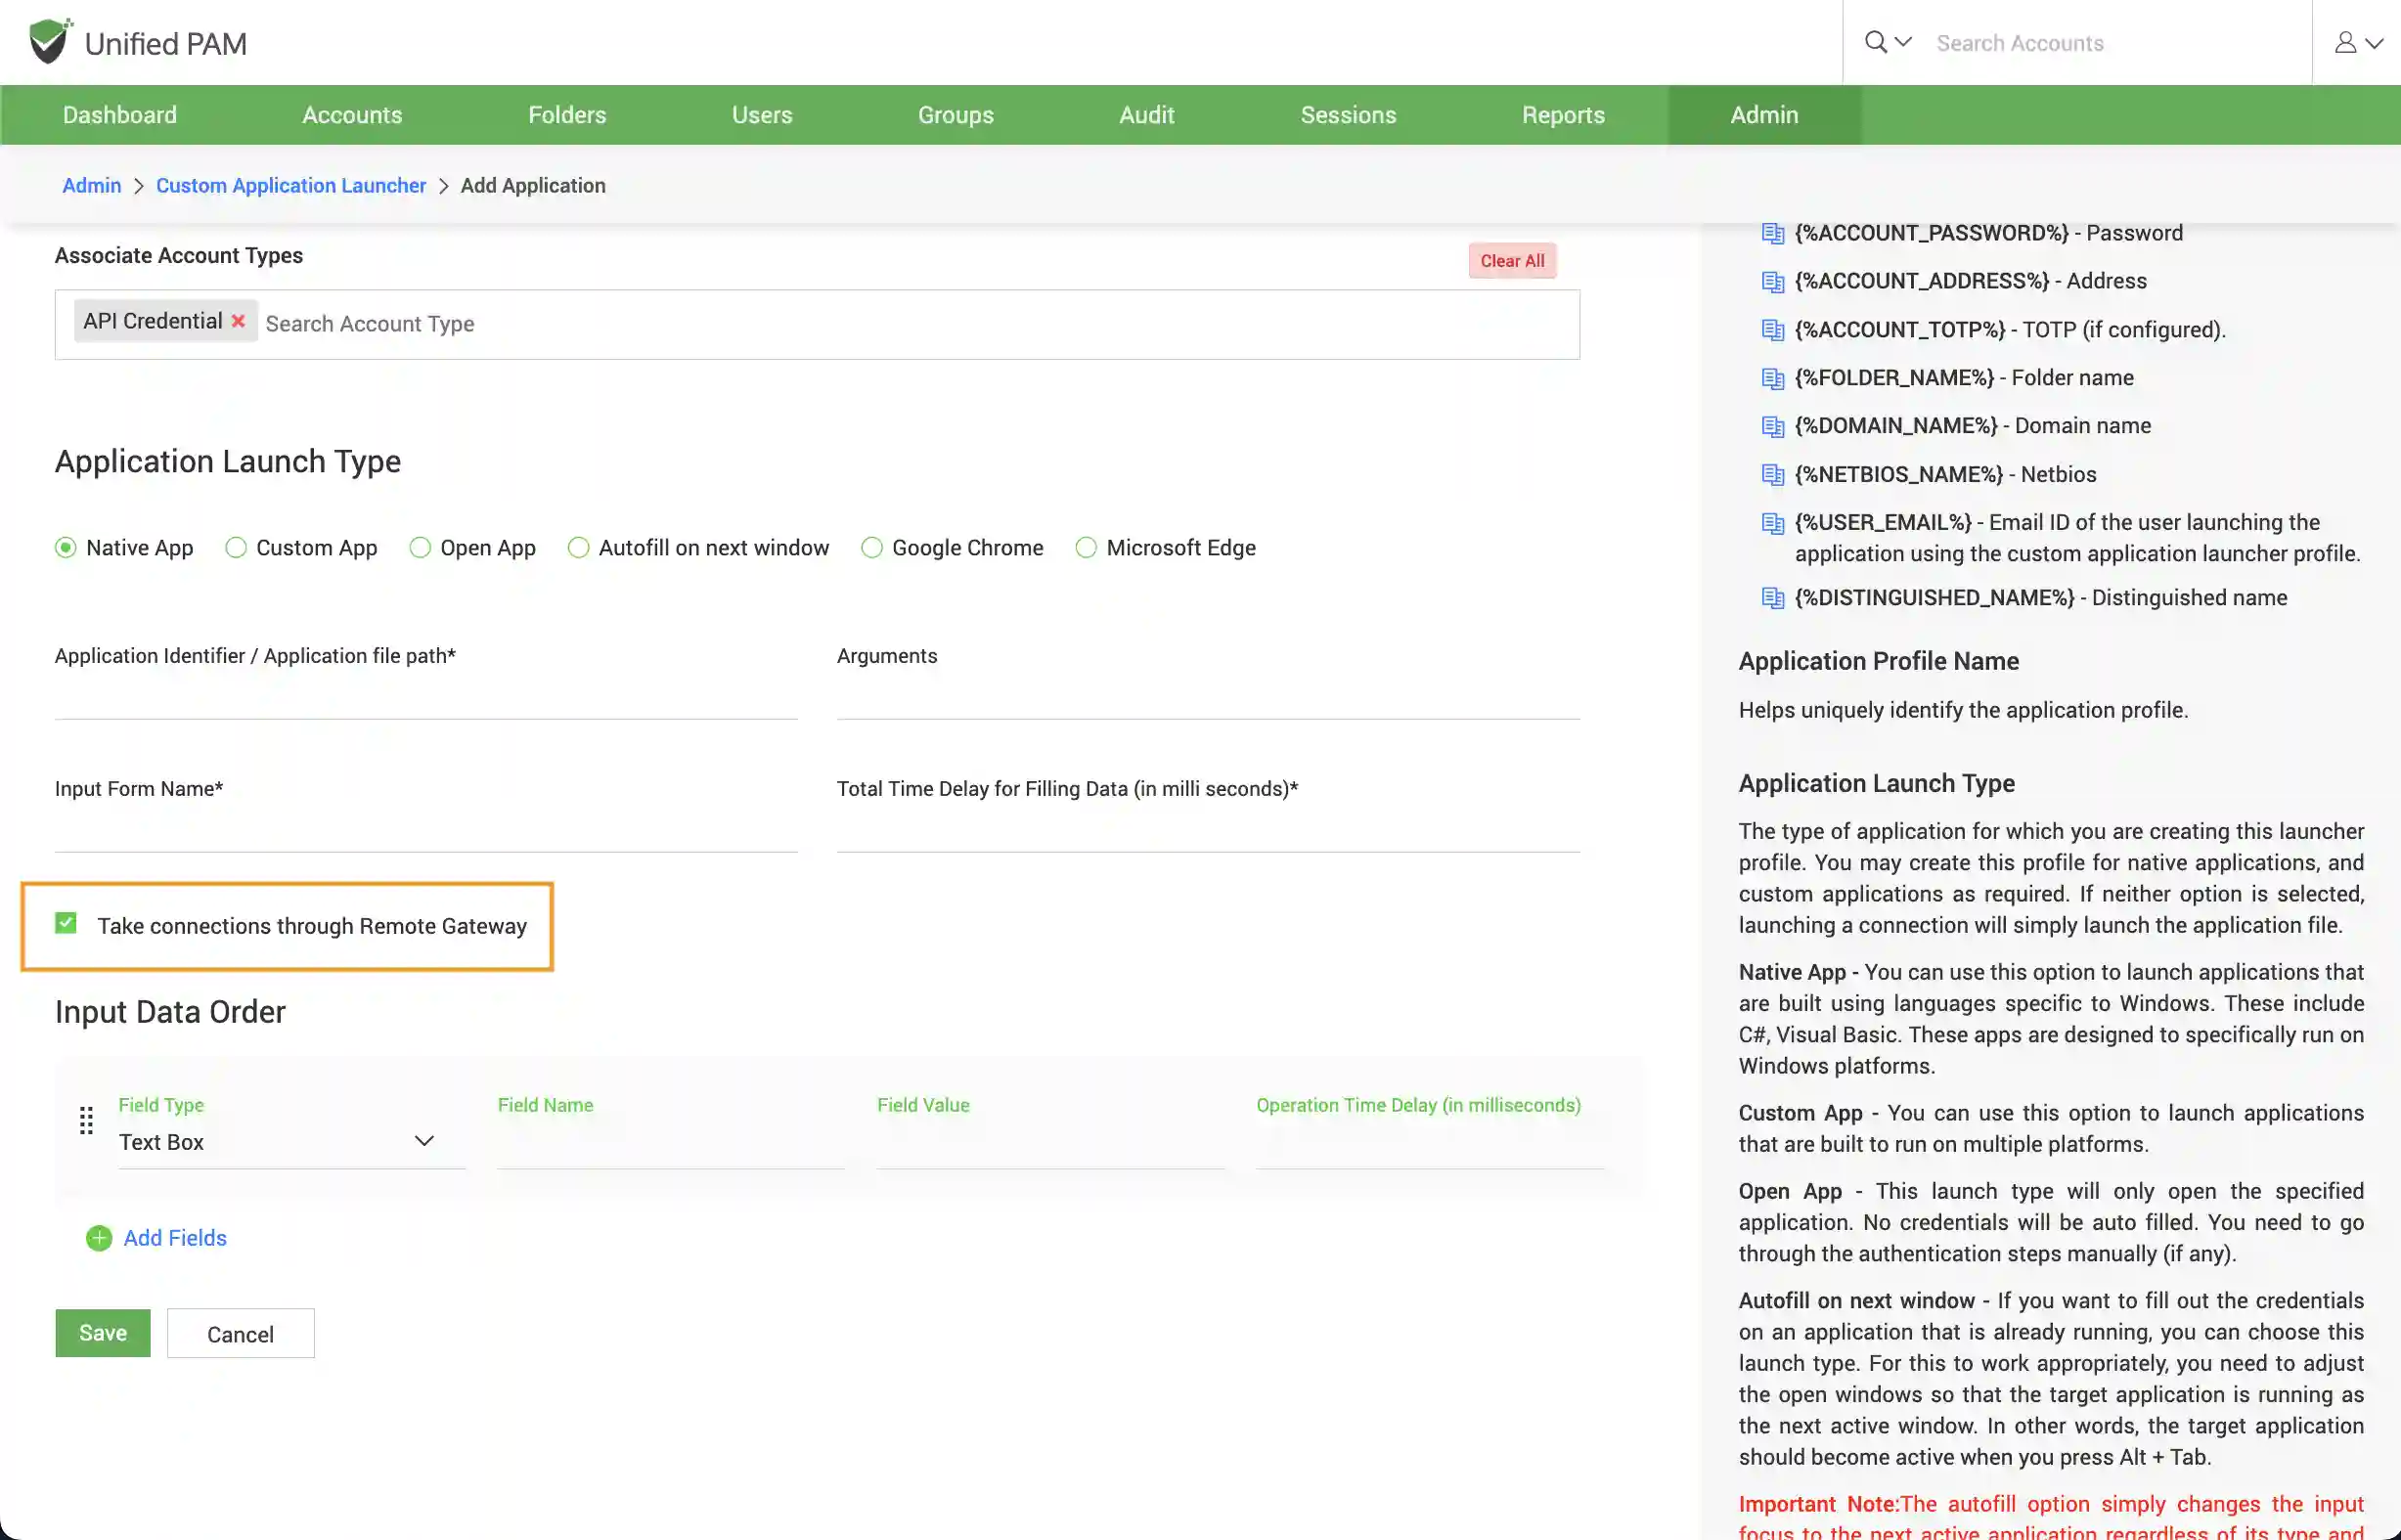
Take connections through Remote Gateway
You can launch custom applications that are added in Securden through a remote gateway. As a pre-requisite, the account from which the connection is being launched must be associated with a remote gateway.
Click the checkbox Take connections through the remote gateway.
Once all configurations are made, you can launch the custom application through the remote gateway. You can create a Remote Gateway from Admin >> Remote Sessions and Recordings >> Remote Gateway
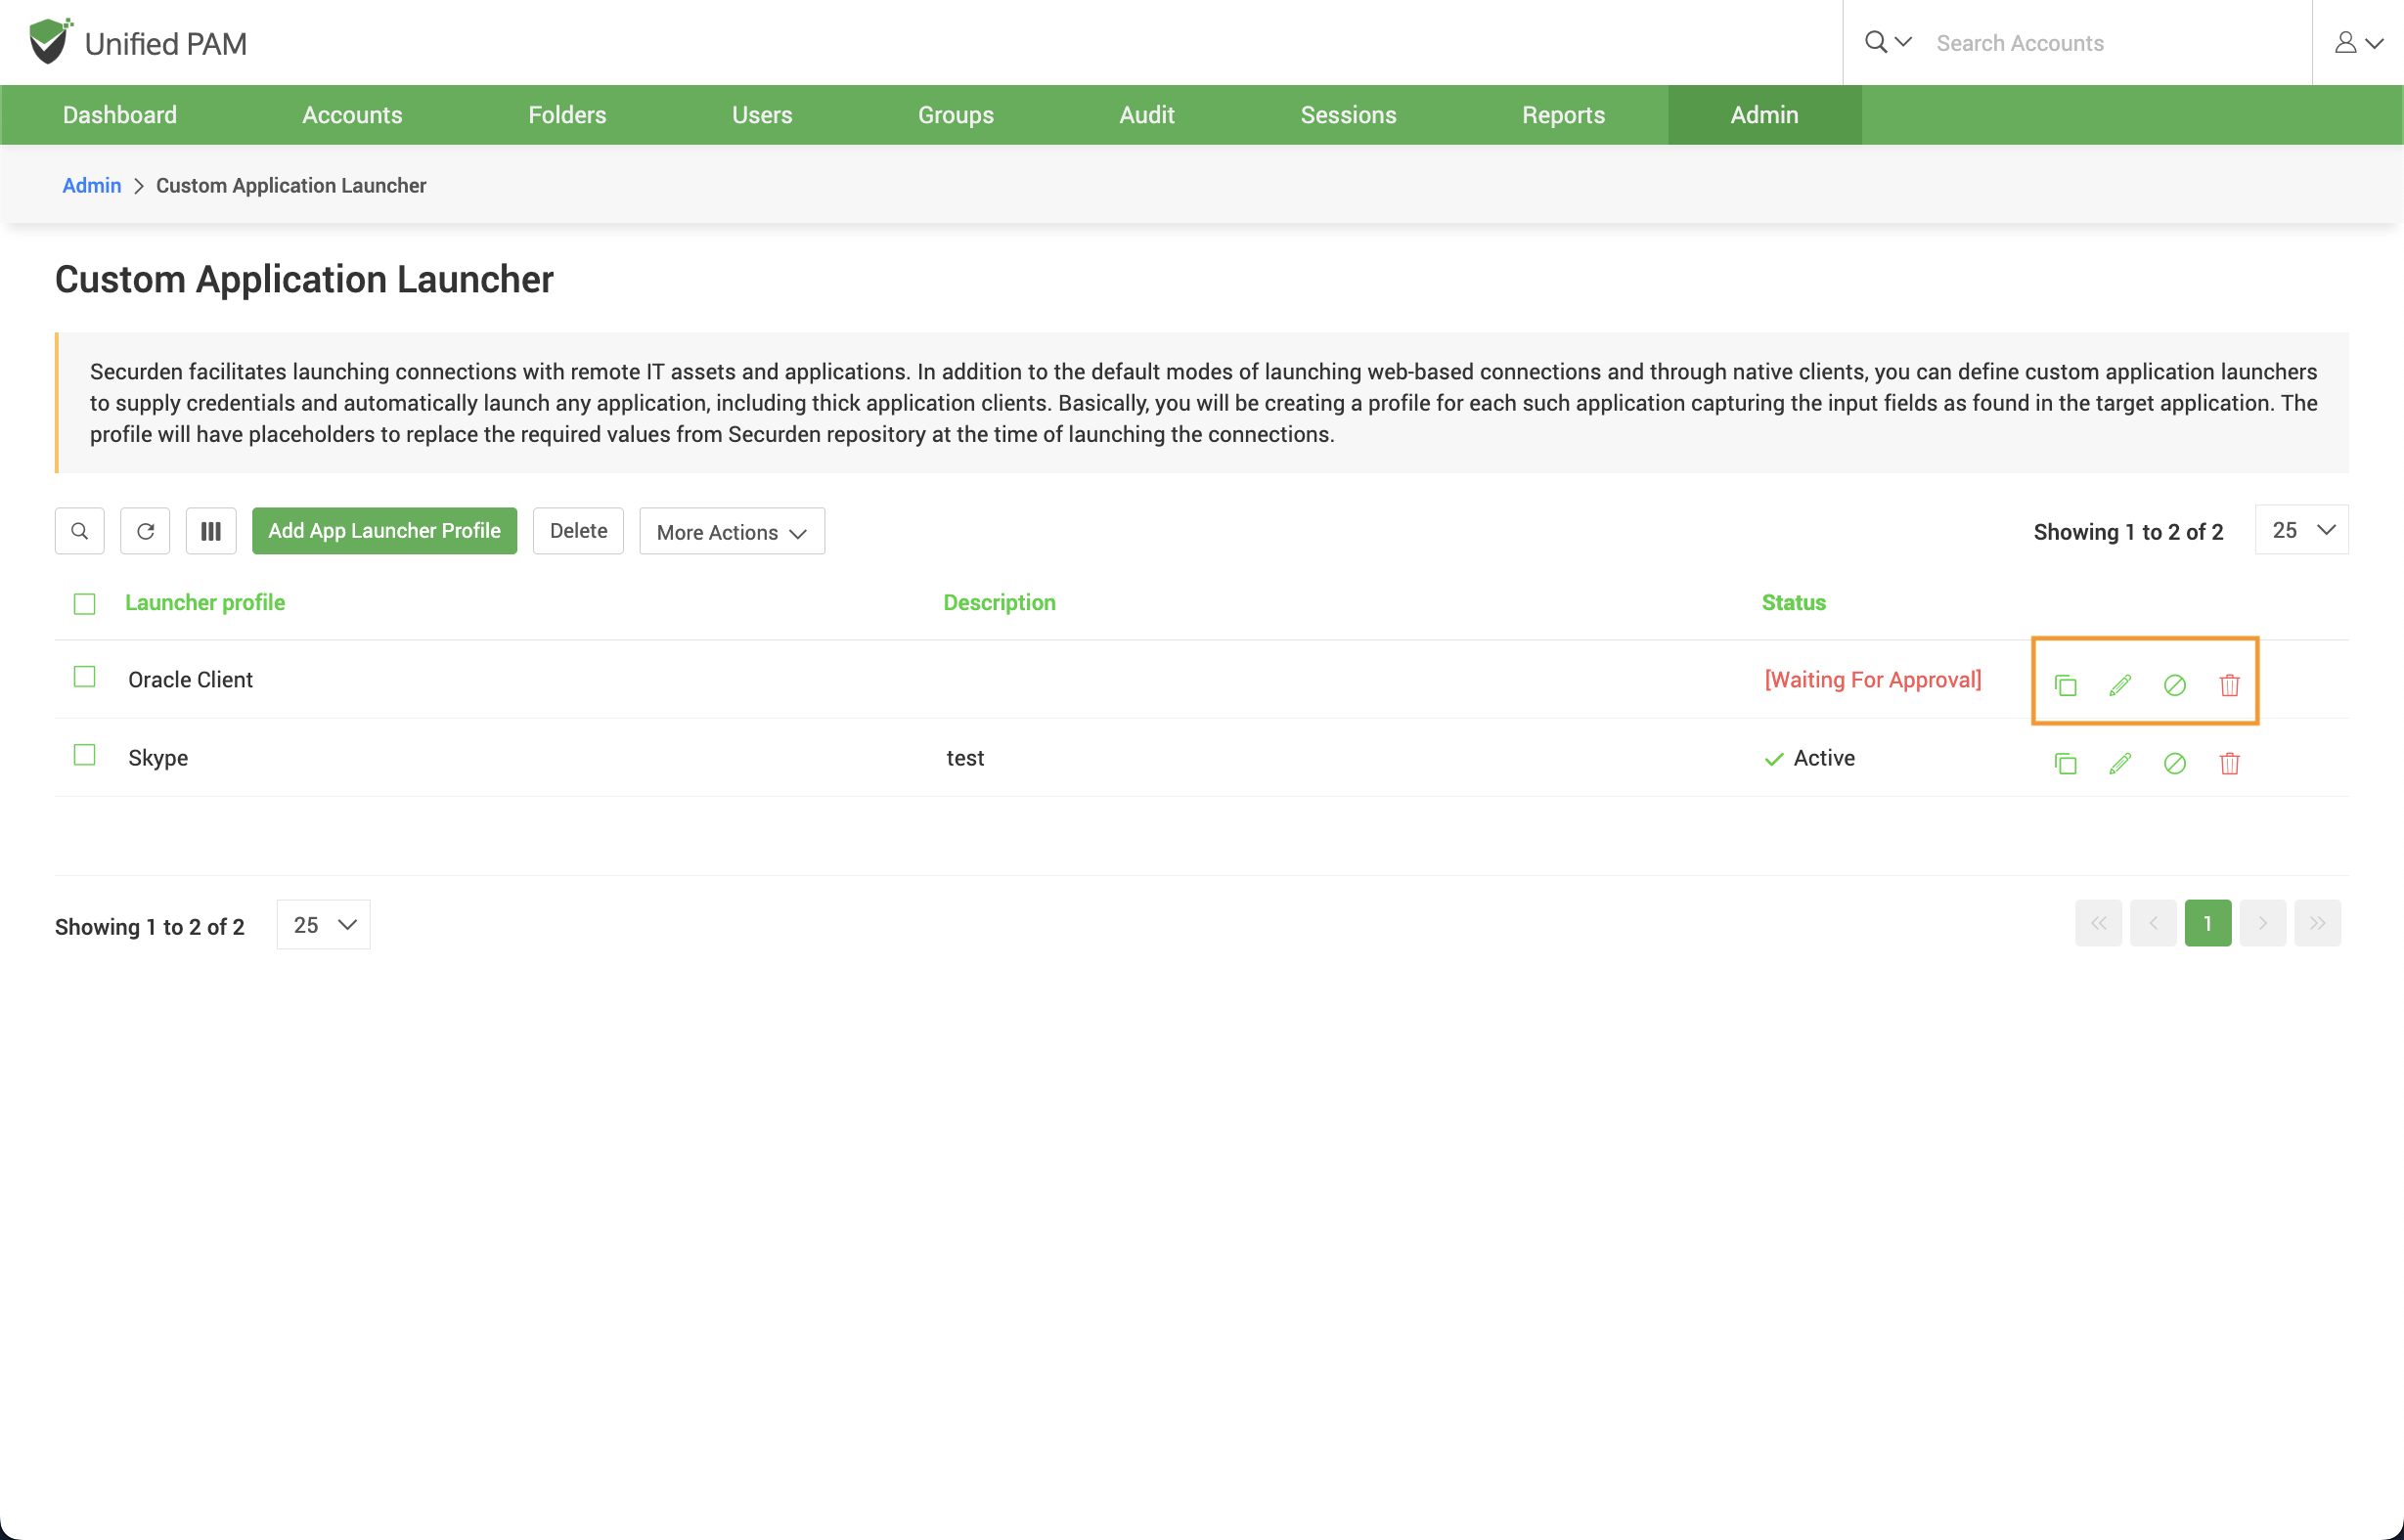
Configure an existing app launcher profile
You have the option to clone, edit, or delete a previously created app launcher profile. This can be done using the action buttons highlighted below.
